Setting up a PS2 HDD with a Free MCBoot Card
Filed under: Technology, Tutorials/Guides
Table of contents
A. Choosing and setting up your HDD
B. Preparing and transferring your games
- 4a. Backing up your games directly from your PS2.
- 4b. Backing up your games on PC.
- 4c. In case you downloaded games online...
- 5a. Transferring games by connecting your HDD to the PC.
- 5b. Tranferring/playing games over an ethernet connection.
- 6. Adding art to your games in OPL.
UPDATE 01/30/2023: Added my method on making FMCB boot from slot 2 and linked an external guide for setting up FMCB yourself (I didn't write it though)!
UPDATE 01/29/2024: Added another section on actually installing .ELF files to your FMCB card, also fixed a few typos and tried to make things a bit clearer!
Have you been trying and failing to figure out how to set up your HDD for PS2 use? Did you just kinda find this out of curiosity and wanna try it out? Well, you're in good hands! I've taken the couple months experience I have trying to get my PS2 set up for this purpose and I'm here to hold your hand through this incredibly tedious process.
This guide ASSUMES you already have a working Free MCBoot memory card, although I do intend to attempt the process on my own in about a week and add it to this guide. Actually, you can read a way better guide than I could ever write to installing FMCB here! It also includes alot of the HDD configuration stuff I wrote here, but my guide CRUCIALLY does not involve using WinHIIP. I still may attempt the FMCB installation at one point, but I think your best bet is just acquiring a memory card with it pre-installed.
Anywho, while you'd think it'd be easy already having the exploit installed, I found the entire rest of the process to be DEEPLY confusing. There's conflicting info all over forums and Reddit posts, plus the fact that many tutorials on Youtube are outdated! Don't get me started on how many guides tell you to use WinHIIP when it's apparently obsolete! Hopefully I can give you an up-to-date, comprehensive explanation of how to softmod your PS2.
Stuff you'll need
Things you will need in advance:
- A fat PS2 model.
- An official PS2 network adapter.
- A compatible hard disk drive (see section A for details)
- A USB flash drive.
Software we will be using:
- FreeMCBoot (on your memory card)
- uLaunchELF (PS2)
- Open PS2 Loader or OPL (PS2)
- HDL Game Installer (PS2 & PC)
- OPL Manager (PC)
- HDL Batch Installer (PC)
- ImgBurn (PC)
For PC programs, try and store them all in one folder (except for ImgBurn) so you have all your PS2 tools in one place.
This guide also assumes the PS2 apps (or .ELF files) are already on your FreeMCBoot card just because that's how I got mine. If not, check out Section C for quick explainer of how to download these!
Optional (but likely necessary) stuff you will need:
- An ethernet cable.
- A way to connect your HDD to your PC (I used an IDE-to-USB connector).
- A computer with a CD drive.
Note: This guide will not include very many troubleshooting steps, because I'm not the most tech-savvy guy in the world and had a pretty painless process getting this stuff done. However, I do hope I can provide enough alternative methods that something works for you! Sadly, some things just end up being hardware issues that I can't help with. Often, I find that the solution is "it doesn't work, so get a new/different one".
If you have a question I can attempt to help but chances are I will end up pointing you to PSX-Place, a Reddit thread, or a Youtube video. I'll do my best though!!!
Update 01/30/2023: I can't confirm this, but I am about 70% sure that this guide WILL work with a slim PS2, however you will have to connect your HDD through the USB port. Unfortunately you'll be locked to USB 1.1 transfer speeds, which will cause many games to not load/play properly! In this case, you may want to forgo using an HDD altogether and instead check out Step 5b for playing games over ethernet. It's much faster than USB and a little better than playing off a disc, but is still slower than HDD.
Choosing and setting up your HDD
1. Checking your PS2 version number.
When choosing your HDD, ideally you should first identify which version your PS2 is. For versions 1-5, you can usually just check the sticker on the back of your PS2 (the one underneath where the network adapter goes) and the number of screws you have. However for versions 6-11, you'll need to check the motherboard... and who wants to do that?? If you're feeling confident about opening up your PS2, then be my guest. If not, you can play the guessing game like I did!
You can find the specifics of what you're looking for to match up with your version number here!
2. Picking an HDD.
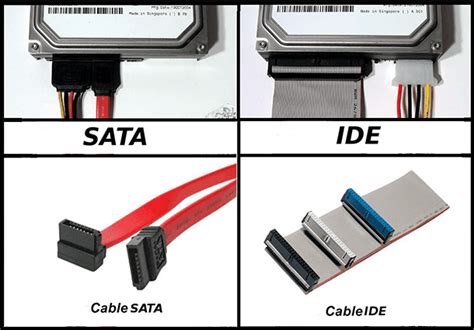
Now that the first part's done, you need to know if your hard drive will even work with the PS2. Hopefully you haven't settled on ANY OLD DRIVE just yet! It's important to note that the official PS2 network adapter only accepts IDE hard drives, so unless you're interested in hardmodding your adapter to accept SATA, make sure you choose a hard drive carefully. The drive bay ALSO is sized for a 3.5in drive, so keep that in mind. You CAN get a 2.5in like I did, but it means your HDD will not fit as securely as it could.
Note: If you do end up getting a SATA upgrade, I recommend staying away from getting an SSD. While it does have some benefits (lower temperature, less noise, more durable because of no spinning parts), you're still limited to the PS2's connection speeds which are a bit dated. Not to mention SSDs are WAY more expensive than HDDs, so it's best to just pay less money for more storage by getting an HDD.
Anywho, certain drives will not work with certain models, so you're gonna need a good reference for which one you should pick. Luckily, there is a PS2 Hard Drive Compatibility Chart that can help you with this!
Since the chart can be kinda daunting to look at, I recommend you mainly pay attention to the PS2, Working, and Adaptor tabs... and the Size too, obviously. You should mainly filter by the ideal size of your drive & your version of the PS2. An IDE drive is most likely gonna be 750GB max, but up to 2TB storage is currently possible with the SATA upgrade mod (although you might have to take some additional steps at that size). Actually, you can use hard drives of any size (exFAT formatted as well) now thanks to a new March 2023 build of OPL!* Anywho, when choosing your HDD, try and make sure your network adapter matches and the hard drive actually works! Sometimes reading the comment left by a user who attempted the drive can help give more insight into the process.
Don't be afraid to test a combination that isn't on the chart already, by the way. I was unable to identify my PS2 by non-intrusive means, so I bought a Seagate ST3250823A (250GB) and tested it out myself - and it worked! Worst case, you'll be short a few bucks and have an HDD you could use for something else instead :^)
*That OPL build is still in beta and not stable yet, so it's pretty finicky. I haven't even gotten it working yet! I'll update the guide in time, but if you want to play with it yourself, then check out the announcement thread.
3. Formatting your HDD.
Assuming you've got your HDD ready to go, pop it in your PS2, turn it on, and open uLaunchELF. If you've got the HddManager already available in your settings, we're in luck! If not, then you have some extra steps to take.
Hit SELECT and then choose an open button under the "Default Button Settings". Hit the circle button and you'll be taken to the file browser to select a function. Scroll down to "MISC/" and hit the circle button again, then go over HddManager and hit the circle button one more time. Bam! Now it's an available option in the menu. Hit the triangle button to leave the configuration settings and then select HddManager from the menu.
If all goes well, your PS2 will detect your HDD! Under HDD STATUS, it should say "CONNECTED: YES / FORMATTED: NO." If that's the case, hit R1 and select Format. Then if THAT goes well, it should say your HDD was formatted successfully! Feel free to turn the PS2 off now, because now we're going to decide how we want to download games to our system.
Preparing and transferring your games
There are actually a FEW different ways you can download games to your system, so I'll go over a couple for different use cases. Now, since a lot of people say "I can't tell you where to find games online", I'm going to say that too because I feel like there's a reason they're saying that. It's not too hard to find a source anyway! However I WILL teach you how to back up your own games through this guide!
4a. Backing up your games directly from your PS2.
I'm personally not very familiar with this method because my fat PS2 has a broken disc drive, but it seems to be the most straightforward method.
As far as I can tell, the process is as follows: open HDLGameInstaller, insert your game disc, hit START, enter your game name and OSD title, confirm, and then wait for the game to download. Easy! You can repeat this with as many titles as you like, as long as your PS2 can read the discs.
As I will mention again later, the OSD title isn't all that important and can match the game title. However, it has to fit within 16 characters, so you might need to shorten it.
4b. Backing up your games on PC.
This method takes... some time... but if you're gonna backup your own game discs it is necessary. So let's get to it! You'll be needing OPL Manager and ImgBurn for this one.
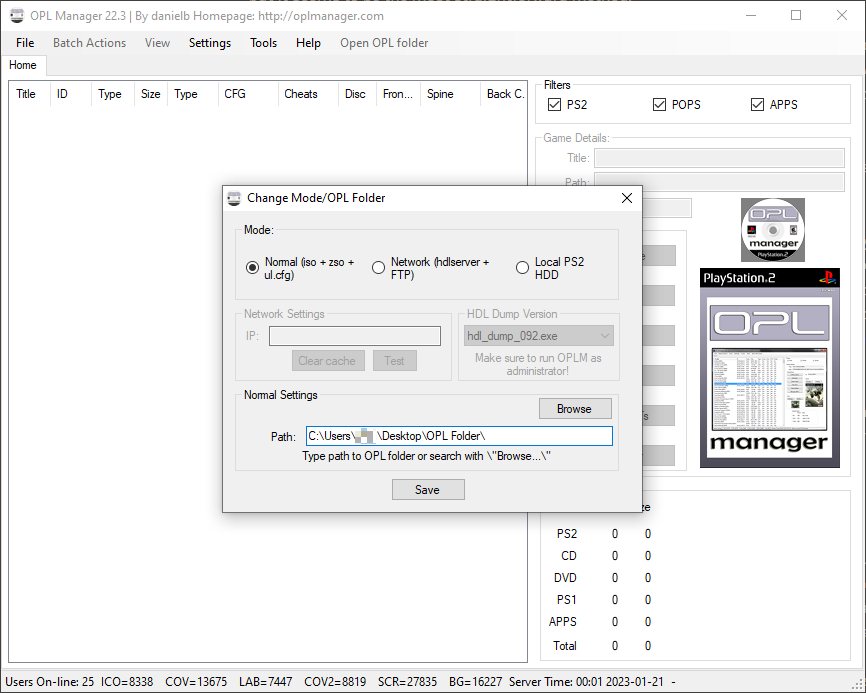
First, open OPL Manager as an Administrator. After clicking through the first couple introductory popups, you'll be taken to the Change Mode/OPL Folder dialog. Mode should automatically be set to "Normal (iso + zso + ul.cfg)". Under Normal Settings, decide where you want your OPL Folder to be (this is where our game files will go) and hit Save.
An error message will pop up, and then another will ask you to create all the folders, so hit Yes. Then boom, you've got a bunch of folders in your OPL Folder now!
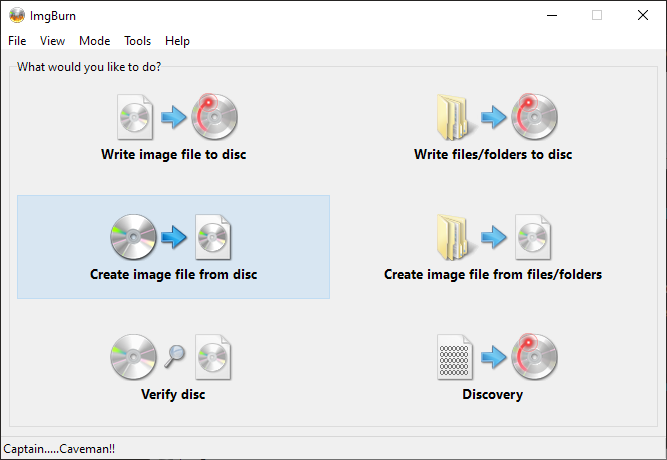
After that, let's actually get our game backed up. Insert your PS2 game into your PC's disc drive and open up ImgBurn. Select "Create image file from disc."
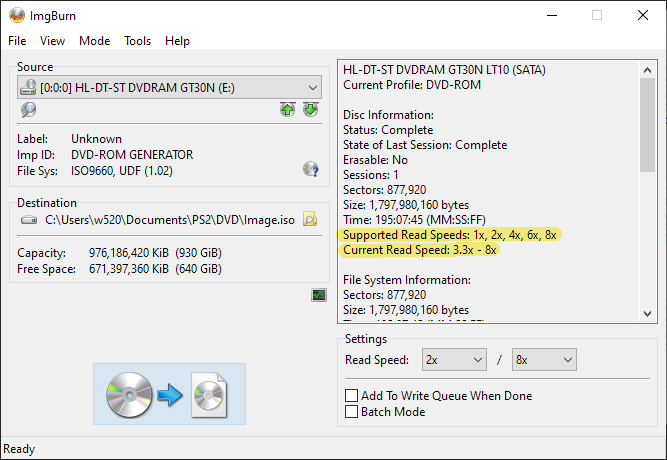
If the program recognizes that there's a disc in your drive, we're in business! Select the destination folder for your iso - it should be the "DVD" folder inside your OPL Folder. As for read speed, it doesn't really matter (although some people beg to differ), so just pick one that is supported by your disc drive. I haven't had any problems with this, but if you have any, feel free to experiment with your read speed a bit.
Anywho! Just click the button on the bottom left of the program and wait for it to finish creating your iso file. It will probably take a little while, and it took me SEVERAL HOURS just to back up my (relatively small) PS2 game collection.
After that's done, move back over to OPL Manager. It should automatically detect all the games you downloaded. If not, go to "File > Invalidate cache and refresh list" and they will pop up. At this point you'll usually see a pop-up that says something about invalid files:
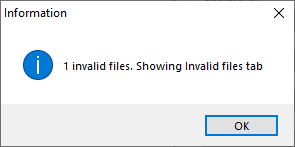
When you look at the games under the invalid tab, it should list that they are using an incorrect naming format. We can easily fix this by hitting "Get title from DB" and then "Try to update file name". Your file should then be valid and will get moved back to the home tab. Go ahead and do this for the rest of your games!
By now you've probably noticed the same default art for each game you've downloaded so far. Let's change that!
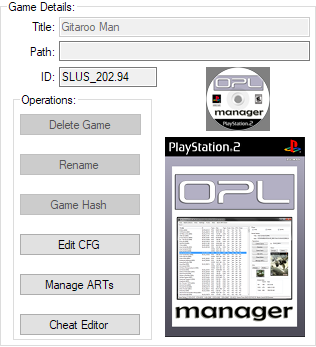
Head to "Batch Actions > ART Download". Most likely, your game file didn't download with any art so I wouldn't bother changing any options. Just hit Start and wait a few minutes for OPL Manager to download the art for each of your games! This process will take a few minutes, so be patient.
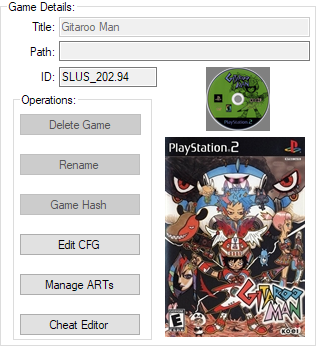
Once the program is done downloading art to all your games, you get a much nicer looking preview like so:
4c. In case you downloaded games online...
...Then follow the instructions in step 4b that involve OPL. You're gonna want all this stuff configured nicely and OPL Manager is the best way to do it.
Occasionally, you might get a .bin and .cue file instead of one single .iso file. You should store these in your CD folder in the OPL Folder. While I THINK there might be a solution where you can play these as-is, I haven't figured it out, so you should convert them to an .iso for ease of use. Luckily, you can do this in OPL Manager as well!
If you open OPL Manager, you'll notice the game doesn't get detected automatically - don't worry about that. Instead, go to Tools and select "Disc/Convert to ISO". Select "bin/nrg/mdf/img/cdi -> ISO" for the Mode. Then, choose "Open file", navigate to your "CD" folder, and select the .bin file for the game you want to convert. Like usual, it should automatically find the Game ID, Title, and rename the iso accordingly. It should ALSO send the file to the "DVD" folder, but you should check that it's going to the right place just in case!
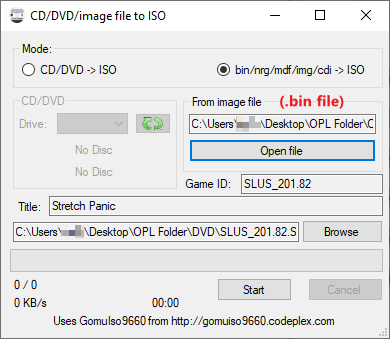
Then, hit Start and your file should successfully convert within a few seconds!
ALSO: if you download a game online, there's a chance you might end up getting a corrupted file or something that ISN'T the game at all. It's good practice to verify your game's hash using a site like redump.org At the same time, I don't know how to do this and also kinda rawdog it whenever I download things online so it's up to you how you go about this.
5a. Transferring games by connecting your HDD to the PC.
Here comes the fun (annoying) part - connecting and reconnecting your HDD to download games! Most likely, if you have a modern PC, you probably don't have an IDE cable to connect your HDD with, so you should find a way to do that. You have a few options - a connector for your motherboard, an IDE-to-USB connector, or a removable HDD enclosure/docking station. I personally went with this bad boy. Some people have experienced issues with using HDD enclosures, so I would recommend a USB connector unless you're sure there won't be any problems.
As for actual transfer applications, you've got a real handful of options. For convenience's sake, we'll go with the two I don't completely despise.
- HDL DUMB - Basic tool for installing one game at a time through the local PS2 HDD.
- HDL Batch Installer - GUI tool that helps you download a bunch of games at once to your local PS2 HDD.
Technically, HDLGameInstaller does come with a PC client, but it sucks and I hate it. However, it's your best option for this guide in the event you want to transfer a game via ethernet cable.
Anywho, for this particular section, we'll go with HDL Batch Installer since I assume you wanna install a bunch of games! Connect your HDD to your PC through your method of choice. Since you formatted it to work with the PS2, you most likely won't see it pop up in Windows Explorer, so don't worry. All that matters is that your HDL program can detect it.
Run HDL-Batch-installer.exe and, once the full program loads, select "Search ps2 HDD's". Your HDD should be detected immediately. Then, select "Search Games", navigate to your "DVD" folder, and select all your .iso files.
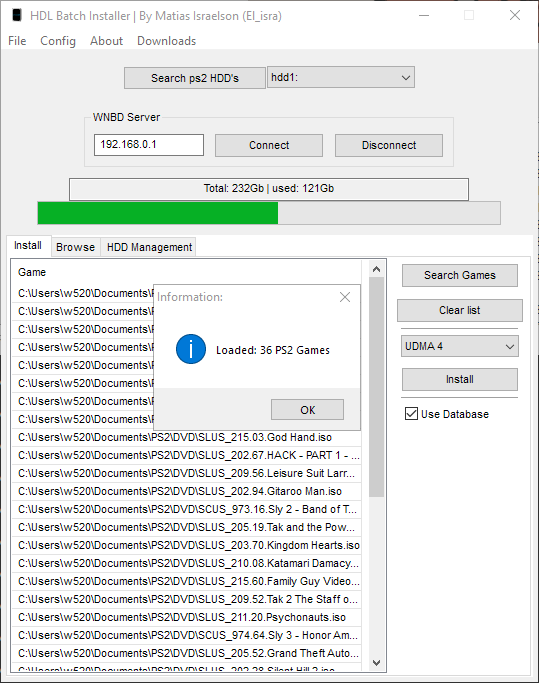
After that, just hit the Install button and sit back while your games get loaded onto the HDD! In the terminal window that opens with HDL Batch Installer, you can get a detailed view of the installer's progress. It took me around an hour or two for the process to finally complete, so give it some time.
If you want an extra (cosmetic) enhancement, skip ahead to Step 6.
5b. Transferring/playing games over an ethernet connection.
This method is very much NOT recommended purely because how much of a pain it is. You'll remember that I mentioned the PS2 has slow transfer speeds - and boy are they SLOW. My 2 hour transfer from PC took around 5 hours using the ethernet cable, and I didn't even get to add in the art and stuff! However, if you don't have anything to connect the HDD to your PC with, I can understand. This method will also allow you to play games over ethernet in OPL, which I ALSO don't recommend because of load times, but it's what I was doing for a while so I can't judge.
To begin with, you're going to need to connect your PS2 to your computer via an ethernet cable. I mainly manage my PS2 stuff with my laptop, so that's probably your best shot. Easy enough right?
Let's start with simply PLAYING games over ethernet! Open up OPL Manager on the PC you're connecting with and leave it open.
On your PS2, open up OPL. Hit the START button and then scroll down to "Network settings". First, you can try setting your IP Address Type to "DHCP". Go down to the bottom of the screen and hit OK, then Save Changes, then go back to the main OPL menu. Scroll over to the "ETH Games" tab and hit the X button. This will attempt to make the network connection to your computer. If it doesn't work, don't fret - it didn't work for me either! Set your IP Address Type back to "Static".
Sadly I cannot help you too much here on my own, since I just followed the advice of YouTube guys and don't totally remember what it was I did. Networking is hard, you know? I can point you to those guides, though!
Personally, I found this guide extremely helpful in getting my network settings all set up:
However, this guide is a lot shorter and may actually be more efficient, although I haven't tried it myself:
If you followed all the steps correctly, rerunning the ETH tab in OPL should start showing a list of the games in your OPL Folder!
Okay, that's cool, but how do we transfer games over to your PS2 storage?
Well, sadly, you're gonna need the HDLGameInstaller PC client that I hate). For this step, you're gonna need to have HDLGameInstaller installed on your memory card. Check the "Further configurations" section of this guide if you don't have it already and don't know how to install it. Load up the program and, if all goes well, it should automatically connect to the network and display any games that are already on your HDD. If not then hit SELECT to edit your network settings to match what you put into OPL.
Then, open up HDLGManClient and type in the IP Address that appears in the top right corner of HDLGameInstaller, then hit Connect. If it goes well, you'll see this screen:
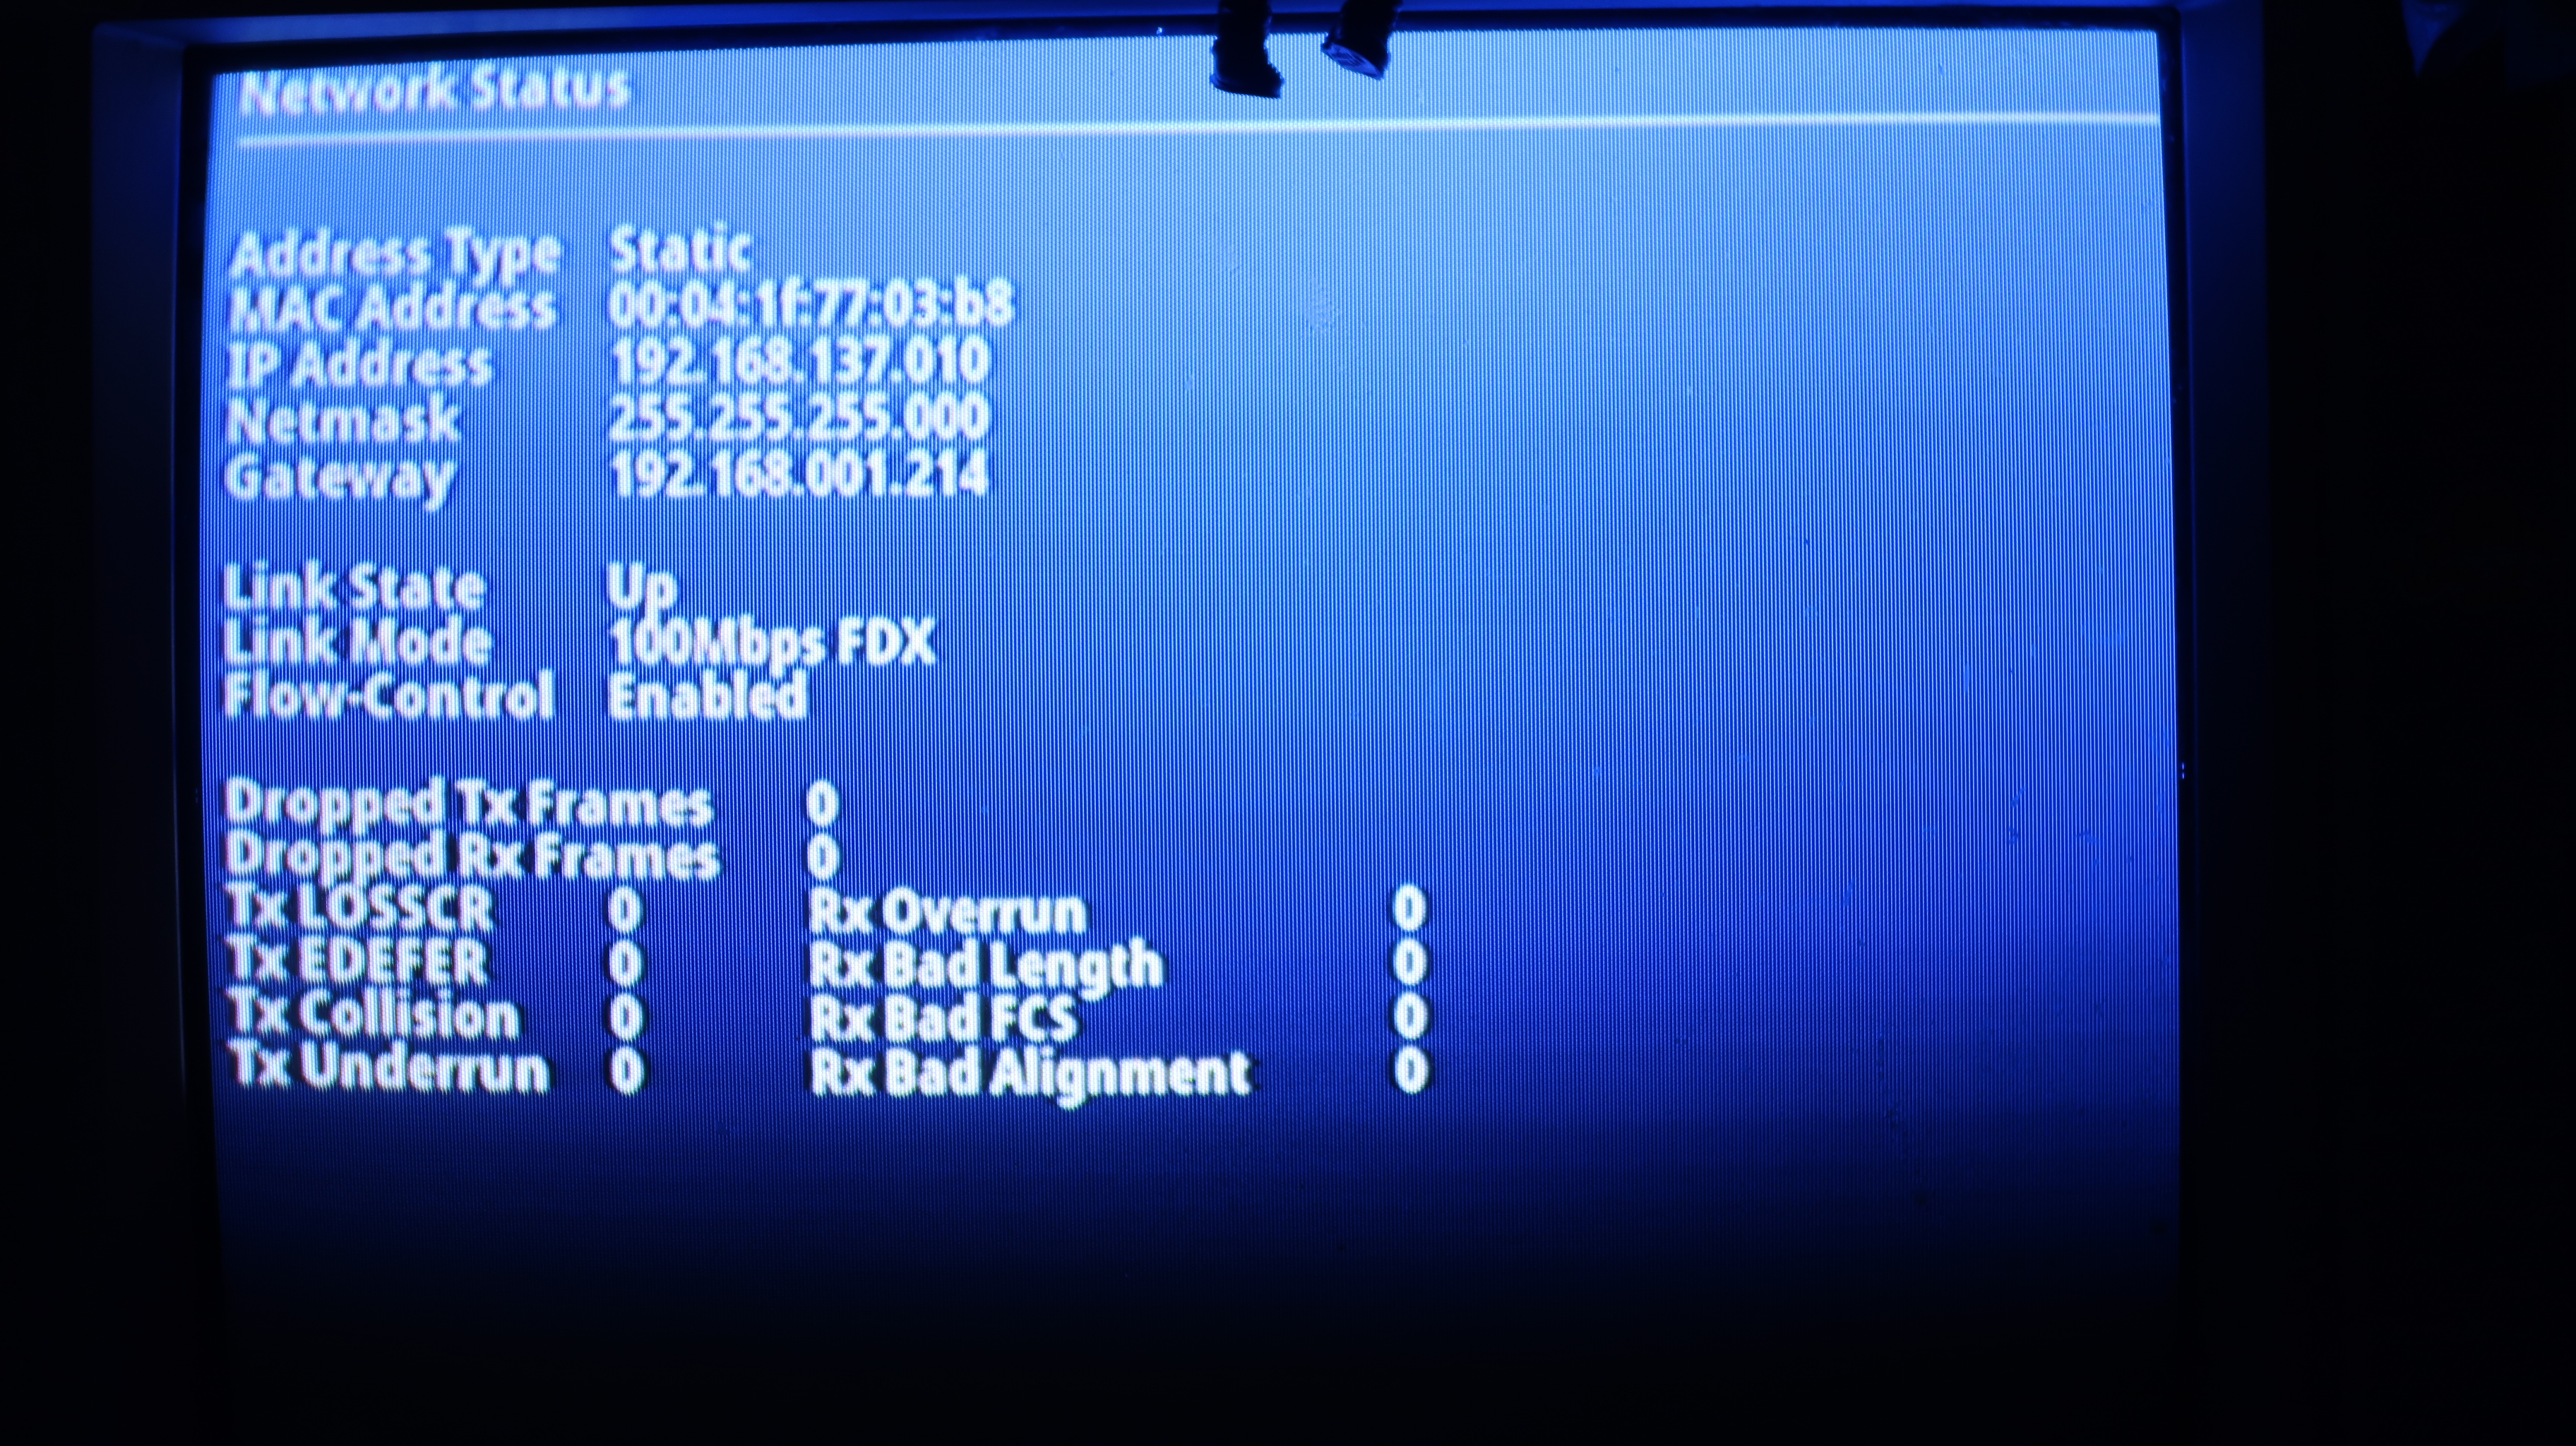
Hint: If that link state ever says "Down", the PC client is gonna get confused and you're gonna have to restart the PS2 and probably HDLGManClient. There is also a chance of data loss, so be careful! Before taking out your ethernet cable, make DOUBLE SURE you hit the "Disconnect" button so you don't experience this dumb issue.
Anyway! In HDLGManClient, click "Install new game" and start adding your games to the Job List. For each game, make sure you select "Disc image" as the Game source and browse to find the specific .iso you want to add. For the titles, you can put the same thing for each one, although the OSD title line can only hold 16 characters, so you may need to shorten the title there. OPL also doesn't display the full title name if it exceeds too many characters, so keep that in mind.
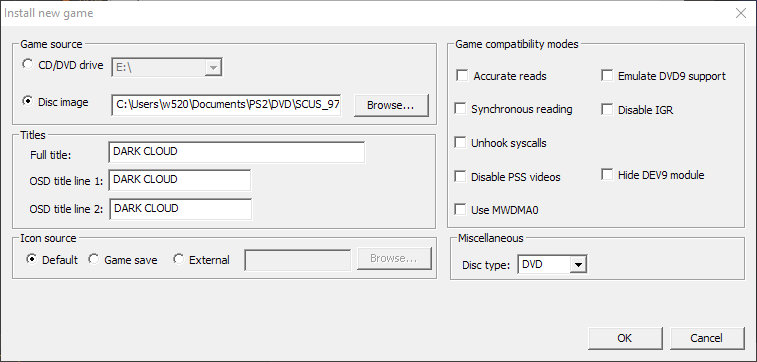
You're gonna need to do this for EACH INDIVIDUAL GAME, which is pretty annoying!! But once you're all done adding games, just hit "Start" on the Job List window and wait for the transfers to complete. Once it's all done, just hit Disconnect and unplug the ethernet cable. You should see your games listed on HDLGameInstaller now, which means it all went well!
6. Adding art to your games in OPL
But wait, don't relax just yet! Now, this next part is optional, but it can slightly enhance your experience when loading up OPL by adding all that art you downloaded earlier. Even though we've just done all this hard work, the art still won't show up in OPL just yet. You've got a couple options for doing this, one that still involves the HDD being connected to your PC and the other letting you finally put it back in your PS2. I prefer this latter method because it means you don't have to install another program! Go ahead and put the HDD back in your PS2.
Open up your OPL Folder once again. All the art you downloaded should be in there under the "ART" folder. Get a USB flash drive and copy the "ART" folder onto it. Then, plug the USB into your PS2 and open up uLaunchELF. Navigate to the "mass/" folder (that's your USB), hit X to mark the "ART" folder, then R1 to open up the context menu. Select "Copy", then navigate over to "hdd0/". Your OPL folder should be named "+OPL/", so open that, hit R1, then "Paste". You'll get a dialog box saying there is a name conflict, but continue and wait a minute for the files to copy over.
And now you're all done! Feel free to remove the USB, open up OPL, and check out your game collection with all that beautiful art intact :3
Further configurations
Using your FMCB card in Slot 2
I'll get this one right out of the way because it's simple. By default OPL should add your game saves to the memory card in slot 1. If your FMCB works the way mine does, then it only loads from the first memory card. What a conundrum! Luckily, all you have to do is swap your memory cards once the game you've selected loads in. The second I see the Playstation 2 logo, I swap them and now I can save my games to my regular memory card. Sure, it's a bit annoying, but what can you do?
Well, you can make FMCB load up from Slot 2 instead! First, turn on your PS2 with your FMCB card in Slot 1, then open Free MCBoot Configurator. After selecting your control scheme, swap your FMCB card over to Slot 2. All you have to do now is select "Save CNF to MC1" and then go back up and select "Load CNF from MC1". Once you're done with all that, hit exit.
Go ahead and reset your PS2 and if you followed the instructions carefully, FreeMCBoot should load up with all your apps all intact! If not, then it's just a matter of adding your programs back through the Configurator menu (see here for more info).
(Note: You might wanna be careful doing this because if it goes wrong, you might be out a FMCB card! This is what worked for me so I'm hoping the same goes for you!)
Load up OPL instantly by caching game list
Another easy fix! Just open up OPL, hit START, go to "Settings", scroll to "Cache Game List (HDD)" and switch it to "On". For a little extra speed boost, scroll down and set "HDD Device Start Mode" to "Auto" and "ETH Device Start Mode" to "Manual". Chances are, if you have your HDD in, you aren't gonna need to bother with the ethernet automatically making an attempt to connect. Go back and make sure you hit "Save Changes" so OPL actually remembers your settings (it's easy to forget to save them).
Installing .ELF programs to your FMCB card
Like I said in the introduction, you most likely already have these programs on your FMCB card, but if you don't, never fear! This process is similar to Step 6 in that you'll need to put all the .ELF files on a USB, then plug said USB into your PS2 to copy them over. Open uLaunchELF and navigate to your "mass/" folder. You should see all the files you downloaded there. Hit X to select each file you want downloaded, then navigate back to the top directory.
You can actually just put these files wherever you want, like on the HDD or memory card, but personally, I like to keep them all on my FMCB card for convenience's sake. So, we'll navigate to "mc1/BOOT/", hit R1, then select "Paste". And BAM! You have the necessary programs installed!
Add your .ELF programs to the main FMCB menu
Some people don't seem to have this problem, but maybe the programs you install (i.e. OPL, HDLGameInstaller) aren't showing on your main menu. Simply head on over to Free MCBoot Configurator and we can add a shortcut to it.
Once the Configurator opens up, select your control scheme and then go down to select "Configure OSDSYS options". In this menu, scroll down to "Configure Item 1" and begin scrolling to the right until you get to an empty item number. Select that and you'll be taken to the item's settings screen. Set the name of the item to whatever you want - I'm going to add HDL Game Installer, so that's what I'll name it. Then, select "Path 1", then go through the folders to find the .ELF file. I put it in my FMCB memory card, so I'll go "mc1/" (since mine boots from Slot 2) and search for the file until it's selected.
And there we go! The shortcut is set. Hit return twice to get back to the FMCB Settings menu and scroll down to "Save CNF to mc1". That way your changes will actually get saved so it appears in the main menu. Exit out of the configurator, et voilà! Your program has been added to the main menu. How convenient!
The configurator allows for 100 item slots, so you can go crazy - although I don't know what you'd need that many slots for...
Things to try and document later:
- Getting POPStarter working for PS1 emulation
- Installing FMCB on my own
- Figuring out virtual memory cards (VMC)
- Adding more images to the guide
- Modding the network adapter to accept SATA drives
- Test out the Grimdoomer build of OPL
- Adding custom themes to OPL
And that's it for my guide! I really hope this was able to help... anyone... literally ANYONE with setting up their PS2. Unfortunately, I wasn't able to include very many troubleshooting steps because I have limited experience with this process. But like I said, I'm willing to make an attempt to help wherever I can! I also want to add that Free MCBoot setup guide, so that'll be tacked onto the end of this once I get another memory card to test it out on.